Monday, May 14, 2018

ABCL: Install ClouchDB

These instructions pertain to a Windows dev environment.

Pre-requisite:

Have Apache ClouchDB already installed.
Install Perl (this was done when Cygwin was installed)
Install NASM and set the environment path.
In order to overcome the error:

 Unable to load any of the alternatives:
   ("libssl32.dll" "ssleay32.dll")

Download OpenSSL 1.0.2o from Sourceforge, extract the directory.
Load up the Developer Command Prompt (requires Visual Studio to be installed before-hand) and browse to the extracted OpenSSL directory.
Follow the commands in INSTALL.W32 (requires Perl), remember to set the prefix.
Once installed to prefix directory, set the environment path.
Download com.sun.jna jna-3.0.9.jar and save it in the path of your dist/abcl.jar for easier access
Quicklisp already installed and added to your init file

Installing ClouchDB

$ java -jar abcl.jar
> (java:add-to-classpath (probe-file #p"com/sun/jna/jna-3.0.9.jar"))
T
> (ql:quickload :clouchdb)
.................


Friday, May 26, 2017

Visual Studio 2015 -> Common Lisp IDE

TL;DR The setup is pretty easy really, all you need is:
  1. Visual Studio 2015 (may work with any VS 201X)
  2. Lisp Integration Visual Studio Extension
  3. ConEmu already installed and the ConEmuIntegration Visual Studio Extension
  4. A Common Lisp implementation of your choice, set in your %PATH% (via Environment Settings)

Figure 1: Editing a Lisp file in Visual Studio, with an emulated integrated Lisp REPL

INTRODUCTION

So earlier this month, I decided to seriously take a second look at Common Lisp, really learn what makes it so great, and start using it as a first language. However, like most people coming to CL, one of the most asked question is, "What editor [can | should] I use?".

Most people are directed to start with EMACS + SLIME as the defacto, or LispWorks or Allegro and they are all great suggestions. However, what if, for some strange reason...we just don't want to use those combinations? Are we banned forever from utilizing the full power of this all powerful language? We just want to get our feet wet, dabble and see if we want to take the full deep dive, without having to learn yet another tool. We have already invested X years in Y editor/IDE,do I need to spend time learning another tool while learning the language? It may be beneficial in the long run, but for now, is there no other way, and if there is, how can I?

There IS Another Way

Honestly, all you really need is an editor and a REPL!

I started out learning lisp using ED + TMUX. I have been VERY productive with that combo for most of my editing and programming needs for the past year or so, and it initially started out well during my Lisp adventuring. I quickly got used to typing parenthesis by hand and had no issue closing them accurately, so that was a none issue. By quickly, I meant I found myself doing it automatically with my first lisp REPL inputs.

However this post is not about which editor / IDE combo is better or doing it right or wrong, this post is about showing that you can start learning and writing Lisp with ANY tool that you are already comfortable with! It is not about learning a new editor, the time should be spent learning the language. As a matter of fact, I even started using Acme again, and found a good work-flow while editing Lisp, it was a seamless experience. Use what you know to learn the language, then once you are comfortable and/or confident enough, you can start tinkering with the recommended or professional tools, or...stick with what you know.

Anyway, the more I got into Lisp, the more I started thinking of projects I wanted to undertake, from Windows Services to cross platform Desktop Applications. I realised that combining Lisp with C++, seemed like an amazing idea, which would lend itself well to blending Lisp with Qt. Enter my search, for yet another editor that would allow me to do so well. Well, I am currently stuck on Windows, and have started to use Visual Studio again, for minor stuff, however I started searching around, to figure out if anyone ever used VS for Lisp editing/projects? Not many it seemed. I wanted to though. So here are the fruits of my research:

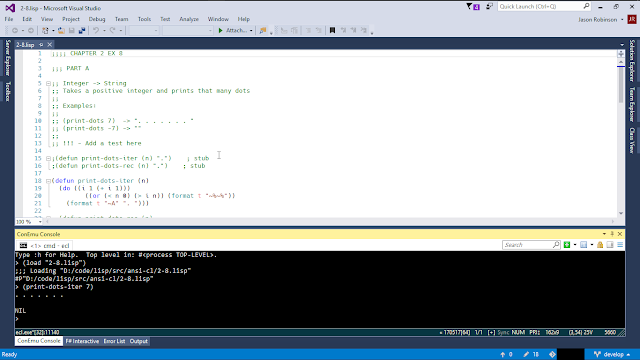
Figure 2: Editor above, ECL REPL below


Is this a good setup? Maybe...I have the editor and REPL in one, which is all any beginner needs for now, contained and supplemented by the power of Visual Studio. This is similar to the Visual Studio F# setup.

Okay, so enough talk, HOW do you get this setup? You need the following:
  1. Visual Studio (Obviously). For my setup, I am using VS 2015 Professional Edition. I believe this can work for VS 2010 and higher, as long as you can install the extensions and they are compatible.
  2. The Lisp Integration Visual Studio Extension.
  3. ConEmu: At the time of this article, I am using the x64 Alpha version which can be downloaded from here.
  4. ConEmuIntegration Visual Studio Extension. Be sure to set your Executable path to point to your ConEmu executable.
  5. A Common Lisp implementation. Does not matter which one. I have two installed, I started with Clozure CL (CCL), however due to my reasons stated above, I am now using Embeddable Common Lisp (ECL). Whichever implementation you are using, set them up in you %PATH%. This is for convenience.
Your setup should look something like Figure 2 above.

I also found that Visual Studio Code has an integrated Terminal, so maybe you can just start there.

Conclusion

I am not saying follow me, I am saying, don't be intimidated or let anything stop you from learning a great language, use what you already know. I wanted to use the best off the bat, be a professional from the start, however if learning the nuances of a strange interface while trying to think in a new language would have been too much, then why not start simple and work my way up. Use Notepad if that floats your boat, just don't be scared off if you don't know Emacs and don't want to. I have nothing against Emacs by the way, I even convinced two of my co-workers to use it, after they saw how much I could do with minimal effort and in a such a short time. It's just that I migrated to Vim 5 years ago and have not gone back. I moved from Vim to Vi to Ed to Acme, however that is not the point of this article, the point is, just start the journey where you are with what you have.

I would also like to thank the authors and the contributors of all the tools mentioned above. Thank You!

Wednesday, October 26, 2016

Install Minimum Profit on OpenIndiana

For fun and minimum profit.

In order to achieve this, there are a few prerequisites.[1]

  • First and foremost, ensure you have pkg-config installed
  • Determine your interface and install the required libraries. MP supports ncurses, Qt4 and GTK. For this guide, I will be using Qt4
  • Setup your C++ environment. We will be using the Gnu compilers. See here for detailed instructions. The OpenSolaris Bible suggests # pkg install gcc-dev, however I did not get to test that[2].
  • Have the latest version of mp ready for installation. At the time of this writing, it is v5.2.10

Preparing the environment

To setup the pre-requisites

# pkg install pkg-config
# pkg install library/qt4
# pkg install developer/build/gnu-make
# pkg install developer/build/make
# pkg install developer/gcc-48
# pkg install system/header
# pkg install developer/build/autoconf
# pkg install developer/build/automake-115

Of course you could run that as a one-liner, however install them seperately just in case there are any issues, you can deal with them as they come up.

A few things to ensure your environment is working [3]
  • Create a cpp file and test that it compiles. Paste the code below into a file called configtest.cpp

    #include <iostream>
    int main(int argc, char** argv)
    {
      std::cerr << "C++ is installed correctly" << std::endl;
    }

  • Then test it out

    $ CC -o configtest configtest.cpp
    $ ./configtest
    C++ is installed correctly

If you recieved anything apart from the aforementioned output, a mess was made somewhere and needs to be rectified.

Installing MP

Yes the instructions are on the github page and they are for the most part all you need to do once everything is in place. Unfortunately, for me it needed additional tweaking.

The tweaks I made can be found on my repo

In the meantime, here are the details.

  • I will be installing to /usr/bin.

    $ ./config.sh --without-gtk --prefix /usr/bin

    After that completes, I made some changes to all three Makefiles. The default prefix is /usr/local and while you can change that from the command line, they were set up to have /bin/ hardcoded on the install path, so at the final installation, I got errors saying it could not install to path /usr/bin/bin/mpsl as an example.

    So I edited the all the Makefiles that were generated and removed the /bin/, as an example:

    From
    install: $(INSTALL_MSG) installdoc $(INSTALLMO)
      install $(APPNAME) $(PREFIX)/bin/$(APPNAME)


    To
    install: $(INSTALL_MSG) installdoc $(INSTALLMO)
      install $(APPNAME) $(PREFIX)/$(APPNAME)

  • Next step, $ gmake

    If you get the following error

    fatal error: symbol belongs to implicit dependency /lib/libsocket.so.1

    then you need to add the following to your config.ldflags files, -lnsl -lsocket. Make sure those linker flags are on their own line, I placed them on the last line. I also edited config.sh to do this for me[4].

    You will get a lot of warnings, but the final message you are looking for is done. Once you see that, you are ready for the final step.

  • Final step

    # gmake install

There have been a lot of ifs up to this point, but you are on the final leg, if everything worked out so far and there are no further issues, then you can start using mp by executing $ mp-5. Otherwise, the error messages are pretty straightforward here and you can further tweak accordingly. Any error messages can be fixed from the first two steps, the most common one for me was the incorrect installation path /usr/bin/bin/mp-5

Enjoy!

Conclusion

I learnt alot from this experience, and all I wanted was to just use this lovely editor on my shiny new OpenIndiana! I hope this saves you some time if you want to test out this lovely gem of an editor, it took me three days of troubleshooting, from finding out about this editor to actually writing this post within it.

Post Conclusion

Oh yes, I almost forgot. This is my mp configuration

mp.config.font_face = "mononoki";
mp.config.font_size = 12;


/* Solarized Qt Colors: https://github.com/altercation/solarized/tree/master/qtcreator
or as close as I could get it */
mp.colors.normal.gui = [ 0x657b83, 0xfdf6e3 ];
mp.colors.cursor.gui = [ 0x657b83, 0xfdf6e3 ];
mp.colors.selection.gui = [ 0xeee8d5, 0x93a1a1 ];
mp.colors.comments.gui = [ 0x93a1a1, 0xfdf6e3 ];
mp.colors.documentation.gui = [ 0x6c71c4, 0xfdf6e3 ];
mp.colors.quotes.gui = [ 0x2aa198, 0xfdf6e3 ]; /* Text between quotes / variables */
mp.colors.matching.gui = [ 0xeee8d5, 0xb58900 ];
mp.colors.word1.gui = [ 0x002B36, 0xfdf6e3 ]; /* 1st definition for special words (i.e. tokens).keywords */
mp.colors.word2.gui = [ 0x2aa198, 0xfdf6e3 ]; /* 2nd definiton for special words (i.e. variables) */
mp.colors.word3.gui = [ 0x002B36, 0xfdf6e3 ]; /* Parens / Operators */
mp.colors.tag.gui = [ 0xCB4B16, 0xfdf6e3 ]; /* Color for tags (symbol names) */
mp.colors.search.gui = [ 0x657b83, 0xFFFFB0 ];

Pretty barebone, but I am still learning. If you have an interest in mp, any experiences or have an amazing config, please share!

Till next time, may the Lord bless you and everything that you do.

References:

[1] Your IPS is up to date rigth? # pkg update
[2] Truth be told, I saw that AFTER I got everything working. I used the Solaris 11
instructions as found in the detailed stackexchange article
[3] Modified from Programming against ArcObjects with C++
[4] Explanations and solutions to this type of error, can be found here and here

Tuesday, October 13, 2015

How to customize x11/sterm on FreeBSD

Looking for a more lightwieght and minimal replacement for rxvt-unicode, one that supported more unicode than urxvt, I stumbled upon Termite. I was trying to get Termite to install, but had 20 show stopping errors at the last part and decided to check around for something else. I stumbled upon st from suckless. I'm already using dmenu, and I liked their philosophy, so if they made st, why not give it a shot.

As a side note, I was trying to figure out how to get st installed on FreeBSD 10.2 and almost gave up, until by complete accident, I saw x11/sterm, and decided to give it a try, and lo and behold, checking it out on portmon it said the projects home page was..dun dun dunnn..st.suckless.org. x11/sterm was FreeBSD's port of st! Install. Now.

Okay great, I installed and got the famous termcap error. Solution was to apply the TERM="xterm=256color" fix. Great, done. It's installed and working, but urxvt is still looking sexier.

st isn't picking up my .Xdefaults file. Okay, so how do I configure it? I have to create my own config.h, edit it to suit my needs and recompile it in...whuh?

I won't bore (or amuse) you with my trials and error. This is for others out there who were lost like me, and for my future self to save me time.

This is how to generate your own config.h:

  1. cd /usr/ports/x11/sterm && make extract
  2. This is my preference, you can get it this way or get it another way by cloning st from github. I prefer to get it from the extract method as my way of ensuring I'm up to date with the FreeBSD port. Copying the extracted directory also has an added bonus as we'll see later on. cp work/st-0.6 /home/Jason/.config/ You can rename it st or keep it as st-0.6, you can also copy the folder wherever you like, I just prefer .config to keep things sane.
  3. Include the newly copied st directory into your dotfiles or git repo. That way if you have to upgrade, or move to a new computer, you will always have your personal settings saved.
  4. cd into the new st directory and cp config.def.h config.h
  5. Modify config.h to your hearts content.
  6. Then when you're finished, go back to /usr/ports/x11/sterm.
  7. Important, if sterm is already installed, please deinstall it. make deinstall clean Also note that whenever clean is run, you lose the work directory.
  8. make ST_CONF=/home/Jason/.config/st-0.6/config.h install clean
  9. Test out st and witness your changes.

So, I already applied my newly found bestest and mostest eye pleasing preferred font of Hack size 14 with antialiasing set to true. I already applied the FreeBSD fix of setting the TERM to xterm-256color.

Which was simple enough as all I had to do was reinstall with the ST_CONF option.

Looking for a more lightwieght and minimal replacement for rxvt-unicode, one that supported more unicode than urxvt, I stumbled upon Termite. I was trying to get Termite to install, but had 20 show stopping errors at the last part and decided to check around for something else. I stumbled upon st from suckless. I'm already using dmenu, and I liked their philosophy, so if they made st, why not give it a shot.

As a side note, I was trying to figure out how to get st installed on FreeBSD 10.2 and almost gave up, until by complete accident, I saw x11/sterm, and decided to give it a try, and lo and behold, checking it out on portmon it said the projects home page was..dun dun dunnn..st.suckless.org. x11/sterm was FreeBSD's port of st! Install. Now.

Okay great, I installed and got the famous termcap error. Solution was to apply the TERM="xterm=256color" fix. Great, done. It's installed and working, but urxvt is still looking sexier.

st isn't picking up my .Xdefaults file. Okay, so how do I configure it? I have to create my own config.h, edit it to suit my needs and recompile it in...whuh?

I won't bore (or amuse) you with my trials and error. This is for others out there who were lost like me, and for my future self to save me time.

This is how to generate your own config.h:

  1. cd /usr/ports/x11/sterm && make extract
  2. This is my preference, you can get it this way or get it another way by cloning st from github. I prefer to get it from the extract method as my way of ensuring I'm up to date with the FreeBSD port. Copying the extracted directory also has an added bonus as we'll see later on. cp work/st-0.6 /home/Jason/.config/ You can rename it st or keep it as st-0.6, you can also copy the folder wherever you like, I just prefer .config to keep things sane.
  3. Include the newly copied st directory into your dotfiles or git repo. That way if you have to upgrade, or move to a new computer, you will always have your personal settings saved.
  4. cd into the new st directory and cp config.def.h config.h
  5. Modify config.h to your hearts content.
  6. Then when you're finished, go back to /usr/ports/x11/sterm.
  7. Important, if sterm is already installed, please deinstall it. make deinstall clean Also note that whenever clean is run, you lose the work directory.
  8. make ST_CONF=/home/Jason/.config/st-0.6/config.h install clean
  9. Test out st and witness your changes.

So, I already applied my preferred font of Dejavu Sans Mono size 12 with antialiasing set to true. I already applied the FreeBSD fix of setting the TERM to xterm-256color.

Which was simple enough as all I had to do was reinstall with the ST_CONF option.

However, wanting to completely replace rxvt-unicode, I needed transparency. I am in luck, as st provides the ARGBBG patch. However my so called luck quickly dissipated like morning mist, as I realised I had no clue how to apply the patch. The more advanced users can now sit back in amusement at my ignorance.

This is how in my newbness I applied suckless patches to sterm.

In my local copy of st-0.6, I made the changes from the diff file...by hand. Yes, I painstakingly checked the diffs and applied the changes to the individual files.

Afterwords...

  1. # cd /usr/ports/x11/sterm
  2. # make deinstall clean
  3. # make ST_CONF=/home/Jason/.config/st-0.6/config.h extract
  4. # cd work/st-0.6
  5. # rm config.mk st.c
  6. # cp /home/Jason/.config/st-0.6/config.mk .
  7. # cp /home/Jason/.config/st-0.6/st.c .
  8. # cd ../..
  9. # make ST_CONF=/home/Jason/.config/st-0.6/config.h install clean
  10. Enjoy new transparent st.
  11. Find out that there is a better way as discussed in the Porter's Handbook.

If anyone has done it more efficiently, please, please, please! I implore you. PLEASE share it with us, so we can spend more time enjoying what st has to offer us and less time in the configs. Thanks in advance.

Sunday, August 23, 2015

Vim: Convert Markdown to HTML

This is pretty obvious, but I just started blogging, and I decided to dust off my old blogger account and use it for my posts, because, why not?

However, what has been bothering me is blogspots WYSIWYG editor, and while I can edit my posts in HTML, I am a bit too lazy to fight the editor. My process was to save rough drafts in Apache OpenOffice's native ODT format, then copy and paste the draft into blogspot's editor and 'polish' off the blog, switching between the Compose and HTML screens.

Then a thought hit me, why not blog in Markdown and convert to HTML, and post the HTML instead. Great idea, but how?

For almost a month now, I had made the switch from Emacs to Vim as my default editor and "IDE" of choice, so I did a search for available plugins and came across this awesome article, Vim Essential Plugin: Markdown to HTML

So I downloaded Markdown 1.0.1, unzipped it and placed it in my /usr/local/binand tested it out...

/usr/local/bin/Markdown.pl: not found

Whuh? Not found? Oh yes, I needed to ensure the file could find my perl, so I edited the first line in the file to reflect it's location.

$ which perl
/usr/local/bin/perl

I edited the first line of Markdown.pl so it looks like this #!/usr/local/bin/perl and I tested it from my terminal this time.

Markdown.pl --html4tags README.md

It's output was splendid, clean HTML. So I assigned my vim shortcut key, like so:

" Markdown to HTML
nnoremap <leader>m2h :%!/usr/local/bin/Markdown.pl --html4tags <CR>

I also downloaded the html2text.py script from Aaron Swartz html2text page.

That way I can now convert between the two formats within vim. Just follow the same steps as we did for Markdown.

As a sign off note, this is my first blog written entirely in Markdown, converted to HTML and published to Blogger!

Saturday, August 22, 2015

UZBL LastPass Bookmarklet

In my attempt to be as minimalist as possible, I came across a wonderful browser I never knew existed before a few days ago, UZBL. From their site:

Uzbl follows the UNIX philosophy - "Write programs that do one thing and do it well. Write programs to work together. Write programs to handle text streams, because that is a universal interface."

Uzbl comes with uzbl-core, uzbl-browser and uzbl-tabbed. For everyday web browsing, I use uzbl-tabbed, which in my dmenu setup, I created a script so that it shows up as just 'uzbl'. Less typing. Uzbl has modes, and keyboard bindings similar to Vi/Vim, so if you are already familiar with that editor, you are almost there.

Now in order to replace Opera, which was my default browser, and was very lightwieght, I needed a few things in place:

  1. Could it render the pages that I visited often and were important to me. CHECK[1]
  2. Does it support LastPass...not in the usual way other browsers do, via extensions.

After much searching on google, I came across an email thread where someone else had accomplished this. Okay, so it can be done, but how? Breaking down the email, I needed to understand two things, how to get the javascript code from LastPass and how to create a bookmarklet for uzbl.


A bookmarklet as it turns out is just javascript, well, that's a simplified explanation, but for this article, that's all that is relevant, and LastPass already has bookmarklets, all I had to do was log into LastPass and I was greeted with this message:

**You are using a browser that currently does not have a LastPass plug-in available.
This may result in reduced functionality. We recommend you use Firefox so you can use the plugin.
Install the bookmarklet if that's not an option.
Clicking the bookmarklet link will show you three options and their explanations. I chose to grab Fill and Fill Forms. Once downloaded, the next step is an adventure, how to actually create an uzbl bookmarklet, luckily someone already created a wiki page on how to do it.

Unfortunately, I could not understand it at first, and missed a few things, so it took me a bit longer to figure out. This is what I did to get it working for me:
  1. Saved LastPass Fill Forms as lastpass_bookmarklet to my home directory.
  2. Run the command from the wiki:

    $ cat lastpass_bookmarklet | sed 's/javascript://' \
    | python -c 'import urllib, sys; print urllib.unquote(sys.stdin.read())' \
    > lastpass_autofill.js

  3. $ mv lastpass_autofill.js ~/.local/share/uzbl/scripts/
  4. $ chmod +x ~/.local/share/uzbl/scripts/lastpass_autofill.js
  5. Edit ~/.config/uzbl/config and add the following line
    @cbind !lpaf = script .local/share/uzbl/scripts/lastpass_autofill.js

That's it, so whenever you need to autofill your login details, just go to Cmd mode and type the keybind you had set in step 5.

1 - As a bonus, I was also able to view sites that opera 12.16 blocked due to certification errors.

Friday, July 24, 2015

Vim: Rebind Caps Lock And Escape

In this article I discuss how I managed to bind Escape to my Caps Lock key and Caps Lock to Escape, not only for my OpenBox environment, but also for my Virtual Terminal/Console.

I recently decided to finally give Vi/Vim a try. Previously, I thought it was too arcane and tried Emacs instead. I was an avid Emacs user and it became my editor and IDE of choice. So why did I decide to switch?
My decision came down to three (3) things:
1. Why not?
2. Striving to be more productive (i.e. lazier...i.e. less keystrokes)
3. Vi is installed by default on Unix, so an advanced editor is always ready. So are ee, ed and a whole range of others, but I like the challenge and wanted to see what the rage was all about. Yes Emacs came with Mac OS X by default albeit an older version, so I still had to install the latest. On FreeBSD? pkg install emacs is your friend.
While using Emacs on OS X, I could easily remap the keybindings for Caps Lock to Control, in fact, it was a builtin feature of the OS. It's a bit more work to get it done on FreeBSD, so here goes.

OpenBox setup:

This was taken from the vim wikia:

  1. vi ~/.vimkeyswapper – you can name the file anything you want, I just wanted the easy reminder everytime I looked at it. This was easier to understand at a glance over '.xmodmaprc'.
  2. Edit the file to include the following contents:
    ! Swap CAPS LOCK and ESC
    remove Lock = Caps_Lock
    keysym Escape = Caps_Lock
    keysym Caps_Lock = Escape
    add Lock = Caps_Lock
  3. Edit either your ~/.config/openbox/autostart if you are using a login manager or your ~/.xinitrc if, like me you only need to start X when you really need to
    xmodmap ~/.vimkeyswapper
  4. Restart X, or reboot just to make sure it takes effect.

Console setup:

Alright, be careful here. We're going into the file system, which requires root privileges. Ironically, I found the original solution here.
  1. We need to decide which keyboard mapping we are using. So you'll need to install misc/kbdscan if you don't already have it installed.
    $ cd /usr/ports/misc/kbdscan && sudo make install clean
  2. Please note, you have to be in the console to be using this, so you can't be logged into X and use your terminals. So ALT+F1 or ALT+F(n) to whichever console you like and login.
    $ kbdscan
    Press and release Caps Lock and make a note of which number appears, for me it was 58
    Press and release Esc, the number I got was 1.
  3. Okay, you may have to do some digging around to find which files match the numbers you got.
    $ cd /usr/share/syscons/keymaps && ls
    Based on your locale, language or keyboard setup, it may be different for you. The file that matched my bindings were us.iso.kbd. [1]
    $ sudo cp us.iso.kbd us.vim.kbd
  4. Edit the file, so it should look something like this:
    # $FreeBSD: releng/10.1/share/syscons/keymaps/us.iso.kbd 74119 2001-03-11 23:41:19Z ache $
    # alt
    # scan cntrl alt alt cntrl lock
    # code base shift cntrl shift alt shift cntrl shift state
    # ------------------------------------------------------------------
    000 nop nop nop nop nop nop nop nop O
    001 clock clock clock clock clock clock debug clock O
    ...
    058 esc esc esc esc esc esc esc esc O
    [2]


    I don't know if it made a difference or not, but I realigned the text before saving the file.
  5. Add this to your /etc/rc.conf file: keymap="us.vim.kbd"
  6. Reboot: # reboot OR $ shutdown -r now
  7. And there you have it, if done correctly, your Caps Lock will now be your new Esc key. Happy coding![3]
[1] – On a side note, they already have us.emacs.kbd, no fair to us vim users :-)
[2] – Ellipses denotes more content, I just did this to highlight the relevant changes. Please don't remove anything from this file.
[3] – I am not sure if this affects console only or the X environment as well, making the xmodmap command unneccessary.