Friday, May 17, 2024

From (Programmers) Dvorak to (Neo) 3L

Dvorak mode: My journey learning the ThreeLayout (3L). I've decided to document my journey and capture my thoughts in a diary / journal format while going through the process. 

Why?: I enjoyed using Programmers Dvorak for the past 6 years, especially during software development sessions. However I had a few initial cons, which are the usual Vi(m) layout, and then later Emacs. Vim wasn't so bad, but when I started getting into Common Lisp, I switched back to Emacs, with Vanilla layout. As any Dvorak user can attest to, that required some finger gymnastics and became a pain after awhile. Swapping Alt with Ctrl eased that pain somewhat, and Lispy was a boon. I remembered using Xah Lee's Emacs keybindings in 2011 when I was getting into Emacs, so I decided to pick it back up, and most Emacs issues dissappeared afterwards. 

Then another issue arose, I realised that after getting in the zone (flow state) and coding for two to three hours, both pinkies were sore. While Programmer's Dvorak made reaching symbols easier, there were times when numbers needed to be interspersed during typing, sometimes a lot. I've been ignoring it for the most part for the past couple years, and it never developed into anything. Yet, it kept annoying me. Of course, an ergo keyboard would solve that issue, if I could afford it. Unfortunately, I am not in that position.

I started researching, and began seeing Colemak DH being touted as a great alternative. The thing is, I was spoilt by the ease of reaching the symbols with my strongest fingers, and Colemak DH seem to stick closely to QWERTY's symbol layout. I was on the verge of trying it out, but I also kept seeing other alternatives pop up once in a while, Neo / CarpalX / etc. The more I looked into Neo or Bone, the appeal was there, especially since it catered to programming. As I was about to give Bone a try, I saw their alternative layout section with a mention of an English focused layout, 3L. That sealed the deal for me, and the rest of this post is the result of that. 

As part of the learning process, I am going cold turkey, just as I did for Dvorak. I switched my Windows and FreeBSD bindings. The following is written solely with 3L.

3L mode

May 15th, 2024

First post typed using Three Layout, while learning, to capture my thoughts and document my progress.
  • Dvorak 1 year, Progrommers Dvorok 6 years
  • Started 3L cold turkey May 15, 2024
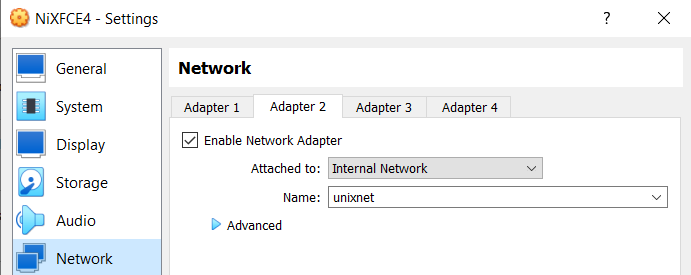
  • Switched Windows (ReNeo) and FreeBSD (setxkbmap us 3L) layouts
  • Using ReNeos onscreen keyboard
  • Trained on Klavaro up to level 20. Home and top rows. 

May 16th, 2024

  • I am left handed, and found it interesting that I spent more time training the left keys with more focus. Would default to Dvorak while training, but making a mistake would "reset" my fingers.
  • The right home keys flowed almost unconsciously. After checking, home row has similarities with Dvorak. e, t, n, s
  • Still confusing O with A...o lat.
  • Wrote company emails. Slow, not painful
  • Retrain up to level 20 in Klavaro. Home and top rows.

May 17th, 2024

  • Started from level 20, learning bottom rows, up to level 31
  • Turned off ReNeo on-screen keyboard and only reference for symbols. Chnfidence boosted.
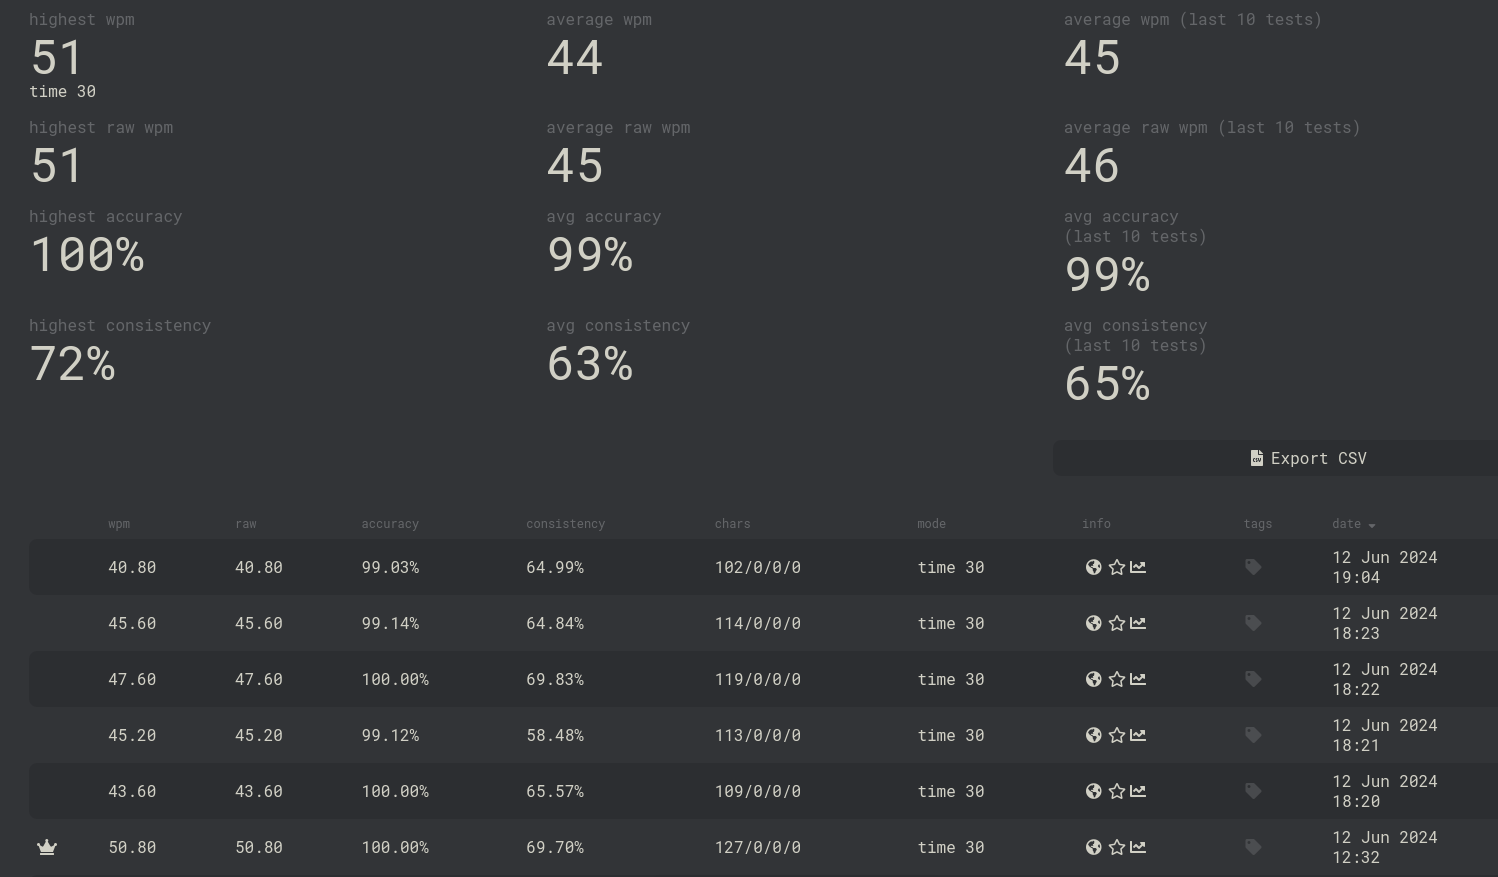
  • After lvl 31, started velocity training. See results of first attempt, also compared with a quick switch over to Dvorak:

3L

Dvorak (tested immediately afterwards)

;; create a new layout
;; 3L with dead keys represented as _
(puthash "3l" "
_ 1 2 3 4 5 6 7 8 9 0 _ _
_ 1 2 3 4 5 6 7 8 9 0 _ _ 

q f u y z x k c w b _ _ \\
o h e a i d r t n s _
, m . j ; g l p v _

Q F U Y Z X K C W B _ _ _
O H E A I D R T N S _
, M . J ; G L P V _
" xah-fly-layout-diagrams)

May 18th, 2024 (After Shabbat)

  •  Just realized why typing feels strangely comfortable. Fingers are either straightened for top row or flexed for bottom row. Only index fingers are moved laterally and no over-extensions, all keys and symbols within reach.

May 19th, 2024

  • Fully committed on FreeBSD, setting my /usr/local/etc/X11/xorg.conf.d/00-keyboard.conf to:
Section "InputClass"
        Identifier "Keyboard1"
        MatchIsKeyboard "on"
        Option "XkbLayout" "us"
        Option "XkbVariant" "3l"
        Option "XkbOptions" "ctrl:swap_lalt_ctl,ctl:swap_ralt_rctl,shift:both_capslock"
EndSection


May 24th, 2024

After some experimenting, decided to utilize Right-Alt as Cur key, similar to Neo based layouts and further reduce right pinky usage. Added benefit of having it act as a Cur 'lock'. Consulting man xkeyboard-config, resulted in the following XkbOptions

Option "XkbOptions" "ctrl:swap_lalt_ctl,shift:both_capslock,lv5:ralt_switch_lock"

Conclusion

WPM are steadily increasing and I am now comfortable enough using it on a daily basis, typing as low as 40 wpm. I only regress to Dvorak when I get in the flow state and start approaching 60 wpm and some of the bi-grams are still troublesome for me (ou, mo, ma, me) but I'm getting used to them.

This is definitely worth the effort of learning and the layers / levels are game changing


Wednesday, May 15, 2024

VirtualBox Virtual Networking between Guests

 Host: Windows 11

Guest 1: NixOS (Linux)

Guest 2: FreeBSD (Unix)

Reason: Needed to migrate files from NixOS to a fresh install of FreeBSD. Unfortunately, BSD was not

detecting the host's Shared Folder, so I decided to copy the file(s) the good old Unix way, SCP. As VirtualBox siloes each guest into its own network, using the default NAT setting, they do not communicate with the Host or the other Guests. Since VBox handles the networking, there are two options, either using Bridged or Internal Networking. This posts uses the Internal Networking option.

The setup for the guests are as follows; each guest will have the primary adapter (Adapter 1) set to the default NAT, and the secondary adapter (Adapter 2) set to Internal Network

Fig 1: NixOS Network Adapter 1 settings

Fig 2: NixOS Network Adapter 2 settings

Fig 3: FreeBSD Network Adapter 1 settings

Fig 4: NixOS Network Adapter 2 settings

Boot the guest VMs and check their assigned IP addresses, labelled as `inet` using `ifconfig`

 On both guests, Adapter 2 settings will be incremented by one(1), example, BSD will show `em0` as the primary and `em1` as the secondary. NixOS will auto-assign the inet and netmask, however, BSD may not. In that case, follow these steps.

  1. Determine the state of the interface with `ifconfig -d`. If the device `em1` appears as output, the interface is down. Alternatively, `ifconfig -u` will show all active network interfaces.
    1. If the interface is down, activate it (turn it on) with `ifconfig em1 up`
  2. Even though `em1` is now active, it may not have an IP address assigned. Even using DHCP, it may not have been leased an address. Either way, provide a static address with the following command
    1. `ifconfig em1 inet <ip.add.re.ss> netmask <sub.net.ma.sk>` the IP address and subnet mask were copied from Guest 1, just incremented the IP by 1. Example, Guest 1 is aaa.bbb.ccc.193, then set Guest 2 to aaa.bbb.ccc.194, keeping the subnet mask the same.
    2. Test your changes with `ifconfig em1`, and by pinging Guest 1. If your settings were accurate, then you should get a response.
  3. Ensure `sshd` is running on Guest 2. If it is, then log into Guest 1, and test it by SSHing to Guest 2. 
  4. Once logged in, disconnect and then use SCP to copy the files from Guest 1: `scp /guest1/local/file <username@guest2:/target/dir`

Monday, May 14, 2018

ABCL: Install ClouchDB

These instructions pertain to a Windows dev environment.

Pre-requisite:

Have Apache ClouchDB already installed.
Install Perl (this was done when Cygwin was installed)
Install NASM and set the environment path.
In order to overcome the error:

 Unable to load any of the alternatives:
   ("libssl32.dll" "ssleay32.dll")

Download OpenSSL 1.0.2o from Sourceforge, extract the directory.
Load up the Developer Command Prompt (requires Visual Studio to be installed before-hand) and browse to the extracted OpenSSL directory.
Follow the commands in INSTALL.W32 (requires Perl), remember to set the prefix.
Once installed to prefix directory, set the environment path.
Download com.sun.jna jna-3.0.9.jar and save it in the path of your dist/abcl.jar for easier access
Quicklisp already installed and added to your init file

Installing ClouchDB

$ java -jar abcl.jar
> (java:add-to-classpath (probe-file #p"com/sun/jna/jna-3.0.9.jar"))
T
> (ql:quickload :clouchdb)
.................


Friday, May 26, 2017

Visual Studio 2015 -> Common Lisp IDE

TL;DR The setup is pretty easy really, all you need is:
  1. Visual Studio 2015 (may work with any VS 201X)
  2. Lisp Integration Visual Studio Extension
  3. ConEmu already installed and the ConEmuIntegration Visual Studio Extension
  4. A Common Lisp implementation of your choice, set in your %PATH% (via Environment Settings)

Figure 1: Editing a Lisp file in Visual Studio, with an emulated integrated Lisp REPL

INTRODUCTION

So earlier this month, I decided to seriously take a second look at Common Lisp, really learn what makes it so great, and start using it as a first language. However, like most people coming to CL, one of the most asked question is, "What editor [can | should] I use?".

Most people are directed to start with EMACS + SLIME as the defacto, or LispWorks or Allegro and they are all great suggestions. However, what if, for some strange reason...we just don't want to use those combinations? Are we banned forever from utilizing the full power of this all powerful language? We just want to get our feet wet, dabble and see if we want to take the full deep dive, without having to learn yet another tool. We have already invested X years in Y editor/IDE,do I need to spend time learning another tool while learning the language? It may be beneficial in the long run, but for now, is there no other way, and if there is, how can I?

There IS Another Way

Honestly, all you really need is an editor and a REPL!

I started out learning lisp using ED + TMUX. I have been VERY productive with that combo for most of my editing and programming needs for the past year or so, and it initially started out well during my Lisp adventuring. I quickly got used to typing parenthesis by hand and had no issue closing them accurately, so that was a none issue. By quickly, I meant I found myself doing it automatically with my first lisp REPL inputs.

However this post is not about which editor / IDE combo is better or doing it right or wrong, this post is about showing that you can start learning and writing Lisp with ANY tool that you are already comfortable with! It is not about learning a new editor, the time should be spent learning the language. As a matter of fact, I even started using Acme again, and found a good work-flow while editing Lisp, it was a seamless experience. Use what you know to learn the language, then once you are comfortable and/or confident enough, you can start tinkering with the recommended or professional tools, or...stick with what you know.

Anyway, the more I got into Lisp, the more I started thinking of projects I wanted to undertake, from Windows Services to cross platform Desktop Applications. I realised that combining Lisp with C++, seemed like an amazing idea, which would lend itself well to blending Lisp with Qt. Enter my search, for yet another editor that would allow me to do so well. Well, I am currently stuck on Windows, and have started to use Visual Studio again, for minor stuff, however I started searching around, to figure out if anyone ever used VS for Lisp editing/projects? Not many it seemed. I wanted to though. So here are the fruits of my research:

Figure 2: Editor above, ECL REPL below


Is this a good setup? Maybe...I have the editor and REPL in one, which is all any beginner needs for now, contained and supplemented by the power of Visual Studio. This is similar to the Visual Studio F# setup.

Okay, so enough talk, HOW do you get this setup? You need the following:
  1. Visual Studio (Obviously). For my setup, I am using VS 2015 Professional Edition. I believe this can work for VS 2010 and higher, as long as you can install the extensions and they are compatible.
  2. The Lisp Integration Visual Studio Extension.
  3. ConEmu: At the time of this article, I am using the x64 Alpha version which can be downloaded from here.
  4. ConEmuIntegration Visual Studio Extension. Be sure to set your Executable path to point to your ConEmu executable.
  5. A Common Lisp implementation. Does not matter which one. I have two installed, I started with Clozure CL (CCL), however due to my reasons stated above, I am now using Embeddable Common Lisp (ECL). Whichever implementation you are using, set them up in you %PATH%. This is for convenience.
Your setup should look something like Figure 2 above.

I also found that Visual Studio Code has an integrated Terminal, so maybe you can just start there.

Conclusion

I am not saying follow me, I am saying, don't be intimidated or let anything stop you from learning a great language, use what you already know. I wanted to use the best off the bat, be a professional from the start, however if learning the nuances of a strange interface while trying to think in a new language would have been too much, then why not start simple and work my way up. Use Notepad if that floats your boat, just don't be scared off if you don't know Emacs and don't want to. I have nothing against Emacs by the way, I even convinced two of my co-workers to use it, after they saw how much I could do with minimal effort and in a such a short time. It's just that I migrated to Vim 5 years ago and have not gone back. I moved from Vim to Vi to Ed to Acme, however that is not the point of this article, the point is, just start the journey where you are with what you have.

I would also like to thank the authors and the contributors of all the tools mentioned above. Thank You!

Wednesday, October 26, 2016

Install Minimum Profit on OpenIndiana

For fun and minimum profit.

In order to achieve this, there are a few prerequisites.[1]

  • First and foremost, ensure you have pkg-config installed
  • Determine your interface and install the required libraries. MP supports ncurses, Qt4 and GTK. For this guide, I will be using Qt4
  • Setup your C++ environment. We will be using the Gnu compilers. See here for detailed instructions. The OpenSolaris Bible suggests # pkg install gcc-dev, however I did not get to test that[2].
  • Have the latest version of mp ready for installation. At the time of this writing, it is v5.2.10

Preparing the environment

To setup the pre-requisites

# pkg install pkg-config
# pkg install library/qt4
# pkg install developer/build/gnu-make
# pkg install developer/build/make
# pkg install developer/gcc-48
# pkg install system/header
# pkg install developer/build/autoconf
# pkg install developer/build/automake-115

Of course you could run that as a one-liner, however install them seperately just in case there are any issues, you can deal with them as they come up.

A few things to ensure your environment is working [3]
  • Create a cpp file and test that it compiles. Paste the code below into a file called configtest.cpp

    #include <iostream>
    int main(int argc, char** argv)
    {
      std::cerr << "C++ is installed correctly" << std::endl;
    }

  • Then test it out

    $ CC -o configtest configtest.cpp
    $ ./configtest
    C++ is installed correctly

If you recieved anything apart from the aforementioned output, a mess was made somewhere and needs to be rectified.

Installing MP

Yes the instructions are on the github page and they are for the most part all you need to do once everything is in place. Unfortunately, for me it needed additional tweaking.

The tweaks I made can be found on my repo

In the meantime, here are the details.

  • I will be installing to /usr/bin.

    $ ./config.sh --without-gtk --prefix /usr/bin

    After that completes, I made some changes to all three Makefiles. The default prefix is /usr/local and while you can change that from the command line, they were set up to have /bin/ hardcoded on the install path, so at the final installation, I got errors saying it could not install to path /usr/bin/bin/mpsl as an example.

    So I edited the all the Makefiles that were generated and removed the /bin/, as an example:

    From
    install: $(INSTALL_MSG) installdoc $(INSTALLMO)
      install $(APPNAME) $(PREFIX)/bin/$(APPNAME)


    To
    install: $(INSTALL_MSG) installdoc $(INSTALLMO)
      install $(APPNAME) $(PREFIX)/$(APPNAME)

  • Next step, $ gmake

    If you get the following error

    fatal error: symbol belongs to implicit dependency /lib/libsocket.so.1

    then you need to add the following to your config.ldflags files, -lnsl -lsocket. Make sure those linker flags are on their own line, I placed them on the last line. I also edited config.sh to do this for me[4].

    You will get a lot of warnings, but the final message you are looking for is done. Once you see that, you are ready for the final step.

  • Final step

    # gmake install

There have been a lot of ifs up to this point, but you are on the final leg, if everything worked out so far and there are no further issues, then you can start using mp by executing $ mp-5. Otherwise, the error messages are pretty straightforward here and you can further tweak accordingly. Any error messages can be fixed from the first two steps, the most common one for me was the incorrect installation path /usr/bin/bin/mp-5

Enjoy!

Conclusion

I learnt alot from this experience, and all I wanted was to just use this lovely editor on my shiny new OpenIndiana! I hope this saves you some time if you want to test out this lovely gem of an editor, it took me three days of troubleshooting, from finding out about this editor to actually writing this post within it.

Post Conclusion

Oh yes, I almost forgot. This is my mp configuration

mp.config.font_face = "mononoki";
mp.config.font_size = 12;


/* Solarized Qt Colors: https://github.com/altercation/solarized/tree/master/qtcreator
or as close as I could get it */
mp.colors.normal.gui = [ 0x657b83, 0xfdf6e3 ];
mp.colors.cursor.gui = [ 0x657b83, 0xfdf6e3 ];
mp.colors.selection.gui = [ 0xeee8d5, 0x93a1a1 ];
mp.colors.comments.gui = [ 0x93a1a1, 0xfdf6e3 ];
mp.colors.documentation.gui = [ 0x6c71c4, 0xfdf6e3 ];
mp.colors.quotes.gui = [ 0x2aa198, 0xfdf6e3 ]; /* Text between quotes / variables */
mp.colors.matching.gui = [ 0xeee8d5, 0xb58900 ];
mp.colors.word1.gui = [ 0x002B36, 0xfdf6e3 ]; /* 1st definition for special words (i.e. tokens).keywords */
mp.colors.word2.gui = [ 0x2aa198, 0xfdf6e3 ]; /* 2nd definiton for special words (i.e. variables) */
mp.colors.word3.gui = [ 0x002B36, 0xfdf6e3 ]; /* Parens / Operators */
mp.colors.tag.gui = [ 0xCB4B16, 0xfdf6e3 ]; /* Color for tags (symbol names) */
mp.colors.search.gui = [ 0x657b83, 0xFFFFB0 ];

Pretty barebone, but I am still learning. If you have an interest in mp, any experiences or have an amazing config, please share!

Till next time, may the Lord bless you and everything that you do.

References:

[1] Your IPS is up to date rigth? # pkg update
[2] Truth be told, I saw that AFTER I got everything working. I used the Solaris 11
instructions as found in the detailed stackexchange article
[3] Modified from Programming against ArcObjects with C++
[4] Explanations and solutions to this type of error, can be found here and here

Tuesday, October 13, 2015

How to customize x11/sterm on FreeBSD

Looking for a more lightwieght and minimal replacement for rxvt-unicode, one that supported more unicode than urxvt, I stumbled upon Termite. I was trying to get Termite to install, but had 20 show stopping errors at the last part and decided to check around for something else. I stumbled upon st from suckless. I'm already using dmenu, and I liked their philosophy, so if they made st, why not give it a shot.

As a side note, I was trying to figure out how to get st installed on FreeBSD 10.2 and almost gave up, until by complete accident, I saw x11/sterm, and decided to give it a try, and lo and behold, checking it out on portmon it said the projects home page was..dun dun dunnn..st.suckless.org. x11/sterm was FreeBSD's port of st! Install. Now.

Okay great, I installed and got the famous termcap error. Solution was to apply the TERM="xterm=256color" fix. Great, done. It's installed and working, but urxvt is still looking sexier.

st isn't picking up my .Xdefaults file. Okay, so how do I configure it? I have to create my own config.h, edit it to suit my needs and recompile it in...whuh?

I won't bore (or amuse) you with my trials and error. This is for others out there who were lost like me, and for my future self to save me time.

This is how to generate your own config.h:

  1. cd /usr/ports/x11/sterm && make extract
  2. This is my preference, you can get it this way or get it another way by cloning st from github. I prefer to get it from the extract method as my way of ensuring I'm up to date with the FreeBSD port. Copying the extracted directory also has an added bonus as we'll see later on. cp work/st-0.6 /home/Jason/.config/ You can rename it st or keep it as st-0.6, you can also copy the folder wherever you like, I just prefer .config to keep things sane.
  3. Include the newly copied st directory into your dotfiles or git repo. That way if you have to upgrade, or move to a new computer, you will always have your personal settings saved.
  4. cd into the new st directory and cp config.def.h config.h
  5. Modify config.h to your hearts content.
  6. Then when you're finished, go back to /usr/ports/x11/sterm.
  7. Important, if sterm is already installed, please deinstall it. make deinstall clean Also note that whenever clean is run, you lose the work directory.
  8. make ST_CONF=/home/Jason/.config/st-0.6/config.h install clean
  9. Test out st and witness your changes.

So, I already applied my newly found bestest and mostest eye pleasing preferred font of Hack size 14 with antialiasing set to true. I already applied the FreeBSD fix of setting the TERM to xterm-256color.

Which was simple enough as all I had to do was reinstall with the ST_CONF option.

Looking for a more lightwieght and minimal replacement for rxvt-unicode, one that supported more unicode than urxvt, I stumbled upon Termite. I was trying to get Termite to install, but had 20 show stopping errors at the last part and decided to check around for something else. I stumbled upon st from suckless. I'm already using dmenu, and I liked their philosophy, so if they made st, why not give it a shot.

As a side note, I was trying to figure out how to get st installed on FreeBSD 10.2 and almost gave up, until by complete accident, I saw x11/sterm, and decided to give it a try, and lo and behold, checking it out on portmon it said the projects home page was..dun dun dunnn..st.suckless.org. x11/sterm was FreeBSD's port of st! Install. Now.

Okay great, I installed and got the famous termcap error. Solution was to apply the TERM="xterm=256color" fix. Great, done. It's installed and working, but urxvt is still looking sexier.

st isn't picking up my .Xdefaults file. Okay, so how do I configure it? I have to create my own config.h, edit it to suit my needs and recompile it in...whuh?

I won't bore (or amuse) you with my trials and error. This is for others out there who were lost like me, and for my future self to save me time.

This is how to generate your own config.h:

  1. cd /usr/ports/x11/sterm && make extract
  2. This is my preference, you can get it this way or get it another way by cloning st from github. I prefer to get it from the extract method as my way of ensuring I'm up to date with the FreeBSD port. Copying the extracted directory also has an added bonus as we'll see later on. cp work/st-0.6 /home/Jason/.config/ You can rename it st or keep it as st-0.6, you can also copy the folder wherever you like, I just prefer .config to keep things sane.
  3. Include the newly copied st directory into your dotfiles or git repo. That way if you have to upgrade, or move to a new computer, you will always have your personal settings saved.
  4. cd into the new st directory and cp config.def.h config.h
  5. Modify config.h to your hearts content.
  6. Then when you're finished, go back to /usr/ports/x11/sterm.
  7. Important, if sterm is already installed, please deinstall it. make deinstall clean Also note that whenever clean is run, you lose the work directory.
  8. make ST_CONF=/home/Jason/.config/st-0.6/config.h install clean
  9. Test out st and witness your changes.

So, I already applied my preferred font of Dejavu Sans Mono size 12 with antialiasing set to true. I already applied the FreeBSD fix of setting the TERM to xterm-256color.

Which was simple enough as all I had to do was reinstall with the ST_CONF option.

However, wanting to completely replace rxvt-unicode, I needed transparency. I am in luck, as st provides the ARGBBG patch. However my so called luck quickly dissipated like morning mist, as I realised I had no clue how to apply the patch. The more advanced users can now sit back in amusement at my ignorance.

This is how in my newbness I applied suckless patches to sterm.

In my local copy of st-0.6, I made the changes from the diff file...by hand. Yes, I painstakingly checked the diffs and applied the changes to the individual files.

Afterwords...

  1. # cd /usr/ports/x11/sterm
  2. # make deinstall clean
  3. # make ST_CONF=/home/Jason/.config/st-0.6/config.h extract
  4. # cd work/st-0.6
  5. # rm config.mk st.c
  6. # cp /home/Jason/.config/st-0.6/config.mk .
  7. # cp /home/Jason/.config/st-0.6/st.c .
  8. # cd ../..
  9. # make ST_CONF=/home/Jason/.config/st-0.6/config.h install clean
  10. Enjoy new transparent st.
  11. Find out that there is a better way as discussed in the Porter's Handbook.

If anyone has done it more efficiently, I implore you, kindly share it with us, so we can spend more time enjoying what st has to offer us and less time in the configs. Thanks in advance.

Sunday, August 23, 2015

Vim: Convert Markdown to HTML

This is pretty obvious, but I just started blogging, and I decided to dust off my old blogger account and use it for my posts, because, why not?

However, what has been bothering me is blogspots WYSIWYG editor, and while I can edit my posts in HTML, I am a bit too lazy to fight the editor. My process was to save rough drafts in Apache OpenOffice's native ODT format, then copy and paste the draft into blogspot's editor and 'polish' off the blog, switching between the Compose and HTML screens.

Then a thought hit me, why not blog in Markdown and convert to HTML, and post the HTML instead. Great idea, but how?

For almost a month now, I had made the switch from Emacs to Vim as my default editor and "IDE" of choice, so I did a search for available plugins and came across this awesome article, Vim Essential Plugin: Markdown to HTML

So I downloaded Markdown 1.0.1, unzipped it and placed it in my /usr/local/binand tested it out...

/usr/local/bin/Markdown.pl: not found

Whuh? Not found? Oh yes, I needed to ensure the file could find my perl, so I edited the first line in the file to reflect it's location.

$ which perl
/usr/local/bin/perl

I edited the first line of Markdown.pl so it looks like this #!/usr/local/bin/perl and I tested it from my terminal this time.

Markdown.pl --html4tags README.md

It's output was splendid, clean HTML. So I assigned my vim shortcut key, like so:

" Markdown to HTML
nnoremap <leader>m2h :%!/usr/local/bin/Markdown.pl --html4tags <CR>

I also downloaded the html2text.py script from Aaron Swartz html2text page.

That way I can now convert between the two formats within vim. Just follow the same steps as we did for Markdown.

As a sign off note, this is my first blog written entirely in Markdown, converted to HTML and published to Blogger!